 Because some of my blog readers have asked "How the heck did you make these?!?!?" I've invited the master-mind behind their creation to be a guest today and show you! Her name is Rosann, and she's one of those very clever people who can look at something, and figure out how to make it herself, and then actually make it out of, "oh just stuff I already have laying around the house."! You, however may need to go to the local hardware store to get the supplies, and here's Rosann now, to tell you what you'll be needing. Rosann--take it away, my friend!
Good morning Little Pink House readers! I'm excited to be here! Let's get going!
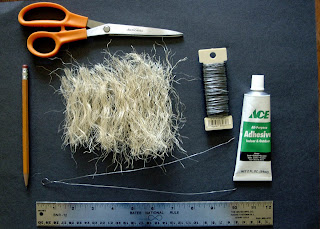
sisal twine ~ your choice
scissors
wire ~ I like 26 gauge steel
rubber gloves
contact cement ~ dries clear
pencil
paper towels
tacky glue
vise ~ clamp type, (or just a drawer that shuts tightly - Jan)
mica
paint brush ~ #12 flat is fine
items to decorate tree
wax paper
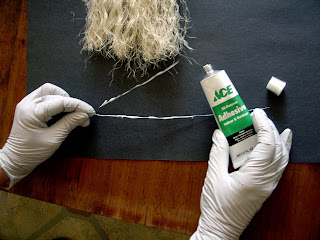
 First ~ protect your work surface. This will make for easy clean-up. Cut sisal into 3”to 4” lengths, then separate strains. Use as much or little for fullest and/or height of tree.Cut wire at least 20” long, then fold in half. Make a loop at top of wire with pencil turning 3 times. Remove pencil. With gloves on, put contact cement on both section of wire were the sisal will lay between.
 Center the sisal on one side of wire then place other half of wire on top, lining it up. (I felt like I needed two more hands at this point - Jan) Let cement set.
  With ends of wire, place into the vise, tighten. With pencil back in loop, start to twist. You may need help the wire twist where sisal is, so use one hand to move sisal round it. Twist enough to hold firmly. Too much and the wire will break. (My first tree did break, but that's OK, it was still usable! - Jan)
 Twist,
 twist, twist and twist some more! This was the hardest part for me--getting the twists even throughout the wire, instead of bunching the twists at one end - Jan
 Remove tree (even though it doesn't look like one yet), from vise. Move sisal around to even out empty or full spots on tree.
 Start shaping the tree with scissors. Remove a little at a time on a 45 degree angle. Have the top of the tree towards you and work out to the base. (Kinda like that old joke about the marble sculpture--cut away anything that doesn't look like a tree ?!?!?)
  Keep the loop on the wire at the top to add a topper, otherwise it can be cut off. Trim wire at base, leaving as much as you need for base / stand.
 Lay a nice layer of mica on wax paper. This makes it easy to return unused mica to container. Brush tacky glue on tree, then roll over mica. May need to sprinkle some mica on by hand. (You could use glitter too, right? I wonder how German glass glitter would look!)
 Choose a base / stand for your tree. Then add on items with tacky glue to decorate the tree. (There are lots of options for the base. Rosann used 1/2 of a small Styrofoam ball, covered in flecks of gold glitter and the mica she used on the tree. You could use a wooden spool, or block too!) Or just anything you have laying around the house!
 Different twines will produce different trees. You can also dye the sisal to make trees for any season! Contact with water will also straighten out the twine as it dries. I used food coloring for my green trees (see picture at the top of this post) before I glued it to the wire, but I bet you could dip them afterwards too! How about PINK for Easter? And then you could glue tiny eggs to the tree, or...or...or...the possibilities are mind-boggling!
 Important point: Some of the twines you find at the hardware stores are NOT SISAL, and don't work as well. They don't turn out as "full" and they won't "take up" any dyes. So be sure you have a true sisal (you can smell sisal, or just ask the sales person if you don't want any funny looks in the rope aisle at the hardware store).
PLEASE--if you make a tree, or a whole forest of them, email me to show us--we'd love to see what you've done! Rosann, thanks so much for showing my readers how to do this!
No problem, Jan. You can also check out www.buildingmodeltrains.com/bottlebrush-trees/, for more instructions. If anyone has any questions you can email Jan and I'd be happy to answer them! Thanks for letting me sit in with you today!


Thanks for the tutoral. I would love to try some of these. I really like the photo with the sisal, the shreaded sisal and the finished tree. Gave me a better idea of what natural colors there are. Also I love the idea of pink trees with little eggs. I'll ask my banties if they could lay some really small eggs for this project. Probably not. LOL.
ReplyDeleteGreat job on the tutorial!!! Thanks Jan and Rosann!
ReplyDeleteThank you so much! I would love to try to make these! I always see them in stores but want them ALL! heehee!
ReplyDeleteSerious cute trees! Thanks for the lesson!
ReplyDeleteWhitney
Whisker Graphics
Beautiful! Thanks for the tutorial. I'm going to share this link with some friends!
ReplyDeleteI just found your tutorial on "Just Something You Made."
ReplyDeleteI have a great love for bottle brush trees. Thanks so much for sharing this wonderful tutorial. Have a great day!
I adore this tutorial, thanks for sharing your brilliance!!
ReplyDeleteB-
Love,thank you for sharing! I should get started for next year's batch...
ReplyDeleteLove bottle brush trees and they are so hard to find thank u for the tutorial will be making these for sure!
ReplyDeleteThanks for putting this up step-by-step. I saw this on Martha Stewart and she trimmed the sisal in a triangle shape before twisting. :)
ReplyDeleteThanks for sharing! I was on seach for bottlebrush trees since last christmas. Of course you can buy these online, but they cost a fortune!
ReplyDeleteUrsel from Germany
Thank you for sharing this! I've seen bottlebrush tress first time. Wonderful idea.
ReplyDeleteGreeting from Germany
Sigrid
Thank you for sharing this. I've seen this kind of trees first time. Great idea!
ReplyDeleteI was going to look for some on my next trip to town, now I will make my own! You did a great job on your layout. Look forward to more of your talent. :)
ReplyDeleteto cutie! I love it that you can make them with just stuff around the house. OK here i go to collect my rope, wax paper and glue!
ReplyDeleteMi nombre es Ana Hello, I will make one and send you a photo, but not to email you and if you do not go up and say that I learned on my blog. Thanks and Merry Christmas and 2013.
ReplyDeleteIf you are wanting to make a whole of these trees invest in a pair of safety wire otherwise known as lockwire, twist pliers. You clamp the pliers onto your loop and then pull on the knob at the back of the pliers. The pliers spin the wire around and around for you. Quick and easy and all the twist are nice and even.
ReplyDeleteliked the tutorial.thanks
ReplyDeleteThanks for sharing this! :)
ReplyDeleteThank you! Thank you! Now I'm ready to try it! : ) Catherine (newest follower of your blogging adventures!)
ReplyDelete