Tuesday, December 18, 2012

Through The Candy Cane Forest

One of my favorite Christmas movies is "Elf".  It's just plain fun! So if you ever find the need to pass through the seven levels of the Candy Cane forest, you can make your own!


Start by cutting 1" or so lengths of Whisker Graphic's Divine Twine. I used Cherry (red & white), Holiday (green & red) and Peppermint (pink & red).


Then, get out your good old white glue. I poured a small amount into a cup and dipped my fingers right in!


Pull a cut length of the twine through your fingers, and lay it on the waxed paper to dry for just a few seconds.


Using a small dowel or the "wrong"end of a small paintbrush, curl one end of the twine half way around it.


Then let dry completely. When they are dry, peel them up and cut off any stray "hair" from both ends, plus any extra dried glue.


Pin It 

They are pretty quick to make--it took me about 20 minutes to make 4 dozen! For more clever ideas using Divine Twine, check out their blog HERE!

December In My Happy Place

Month after month I am privileged to continue my consignor-ship at the store where I have been selling my vintage wares for over eight years now--Room With A Past! Here's a peek at what I started with last weekend:

There's still some goodies left! You can see them at our fabulous New Year's Day sale, when everything holiday-related is half off! Come in your jammies and grab a plate to nosh on our full brunch! You can also strike a "deal with the dealers" for even more bargains! For more info, check out the email reminder you'll be getting soon in your inbox, or sign up here!


Pin It

Monday, November 12, 2012

Miniature Bottle Brush Tree How To

Oh deer!


Does your dearest little deer need a festive tree? How about we make one (or a whole forest of 'em!) real quick? I made Whisker Graphics Divine Twine bottle brush trees for my Design Team project this month. Here's the "How To":

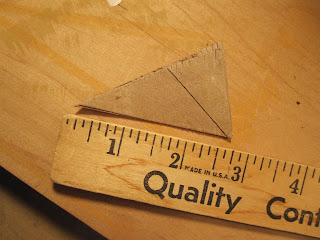
Start with a cardboard triangle. Mine was about 3" long on one side. I cut little notches along all the edges to keep the twine from slipping.

Then I cut a piece of 22 gauge wire about 8 " long.

I snuggled that wire right in the middle along one long edge of the cardboard and began wrapping the color of my choice twine (may I suggest, the new solid color twine also?) around and around and around (I easily used about 7' of twine) until...


it's about 1/4 inch thick. Then I folded the part of wire at the pointy-most end of the cardboard (aka the top of the tree) down along the outside edge to meet the other half of wire

and twist it on tightly.

With a utility knife (or a small, sharp scissors), I cut along the edge opposite of the wire. 

until the entire length was cut, and opened the twines. Using pliers on each end of the wire, I began twisting

and twisting, and twisting....

until the twines looked nice and full. Then I cut the ends evenly to get a neat little cone shape!


Next, I cut a 2" Styrofoam ball in half, then sliced off an additional 1/4" section from the flat end, yielding a small "hill" and a flat "disc".


Using the "hill" , I poked the end of the tree's wire into its center so my fluffy tree could be moved without being handled and the twine flattened. 

Grab your stiffest, most stickiest hair spray that you would usually use on your bouffant hair-do (my beauty secret is revealed!), and douse that tree like no body's business.

Quickly add glitter while the tree is still wet. Now using the "hill" as a stand, set the tree upright and let it dry.

If you desire to make a little scene with your tree under glass, (and who wouldn't!!) assemble the items you'll need like a glass jar & lid, or a dish and a stemless wineglass, little Christmas village people or some deer.

Paint the disc with craft paint, coat with tacky glue and add more glitter. Adhere the disc to your jar lid or dish with tacky glue. Snip the remaining wire off the Divine Twine bottle brush tree to about 1/4' and add a dot of glue, then push into the disc. Glue your glittery branches or tinsel trim in the same way. Glue the dome to the saucer with epoxy glue.


Talk about a Merry "Little" Christmas!!!
Looking for more twine crafting ideas? Visit the Whisker Graphics Blog!

Linking up with Make It Pretty Mondays at the Dedicated House

Pin It

Tuesday, October 16, 2012

What A Nut!

I know it's not "proper" to wear white after Labor Day, but what's the rule of thumb on flip flops? I am still wearing them as I decorate for fall! You may have seen my last post about the drool-worthy package I received from Whisker Graphics in the mail. Here's my October Design Team project I've made with its contents!


These Thanksgiving/ Halloween place cards can be whipped up pretty quickly! Just wrap the NEW solid Divine Twine around a DRIED acorn (don't use a green one or you'll be sorry!), adhering it with a tacky glue.


Then glue a twine "stem" (an 8" length of twine with a knot in the center) onto the acorn cap.


When all is dry, tie the stem through a couple of yummy confectionery colored tags (punch or decoratively cut the end of the tag for added whimsy!) and write or stamp your guest's name on the card.


Ready? Set.... fun eats!

I am linking to Make It Pretty Mondays at the Dedicated House!


Pin It

Thursday, October 11, 2012

Divine Mail


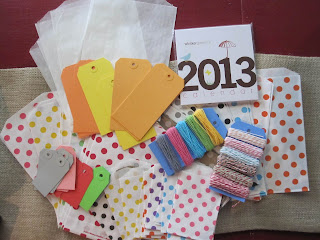
Look what I got in the mail today! It's new product from Whisker Graphics!


Since I'm on the Design Team there, I often receive a box in the mail. It's like Christmas!
Look at these new twines! Did you ever have a telephone repairman (they were all men when I was little!) come to work on your street, you know when phones needed WIRES?!?!? After they left there were always small lengths of colorful wire left on the ground! (I still have some!) That's what these new, delicious Divine Twines remind me of! And look at the brand spankin' new SOLID twines!!!! I already have plans for them...


Tag--you're it! These TAGS are to dye (hee hee!) for! They are powdery soft, festive colors that I can't wait to craft into ..... something, I don't know what just yet! And the Bitty bags, oh the Bitty Bags, in all their glorious polka dotted-ness.


And so I can keep track of when I submit my monthly Design Team projects--a handy & fun desk calender! There are a couple of different styles you can order.


Come back next week to see what I make when I share my October project!


Pin It

Thursday, September 27, 2012

The Aftermath!


Whew! What a great sale we had at Room With A Past! Here's the "before" of my spot!


And "After"! I sold so much I had to bring a few things in from the Parking Lot Sale just to fill my space!!!


Hope you can make the next one--October 18- 20th. The whole store will be TRICKED out for Halloween!


Pin It

Wednesday, September 19, 2012

Here's My Spot!

Whooo whooo whooo knows what time it is? It's time for the September sale at Room With A Past!


I finished setting up my little spot on Monday! Here's a sneak peek!


I had fun drawing a Fall-themed picture on the door-turned-chalkboard!


I stayed with a yellow, gold-beigey, brown and white color scheme.


Can you see the vintage hats? I have three of them plus a leaf headband. (You can click on the pictures to see them larger).


The radio is old but it still works (just like me!) Hope you can make it in Sept. 20 - 23rd. Don't forget the last PARKING LOT SALE will be going on Saturday and Sunday--the last one until next summer!

Pin It